How to Configure MySQL 8 Replication
How to Configure MySQL 8 Master Slave Replication on Ubuntu

Setup Prerequisites:
You need to have MySQL Server installed on all servers
Make sure the Hostname and IP addresses are added on /etc/hosts
# Hosts Entry for MySQL Master & Slave Node
192.168.0.8 MySQL-Master MySQL-Master
192.168.0.9 MySQL-Slave MySQL-Slave
Step 1: Configure the Master Server:
server-id and log_bin location have to be configured
The first configuration change to make is setting Server ID for the master database:
$ sudo vi /etc/mysql/mysql.conf.d/mysqld.cnf
Add the line below under [mysqld] section. Note that the number set needs to be unique, it can not be re-used on any node in the cluster.
server-id = 1
Set log_bin location, this is where all replication information is located. All the changes made on the master are written to this file. All slaves will copy data from it.
log-bin = /var/log/mysql/mysql-bin.log
tmpdir = /tmp
binlog_format = ROW
max_binlog_size = 500M
sync_binlog = 1
expire-logs-days = 7
slow_query_log
A complete simple configuration looks like below:
[mysqld]
pid-file = /var/run/mysqld/mysqld.pid
socket = /var/run/mysqld/mysqld.sock
datadir = /var/lib/mysql
log-error = /var/log/mysql/error.log
server-id = 1
log-bin = /var/log/mysql/mysql-bin.log
tmpdir = /tmp
binlog_format = ROW
max_binlog_size = 500M
sync_binlog = 1
expire-logs-days = 7
slow_query_log
Restart mysql service for changes to take effect:
$ sudo systemctl restart mysql
Step 2: Create Replication user on Master database server
We now need to create a database user to be used by slaves when connecting.
Login to MySQL database as root user and create the user:
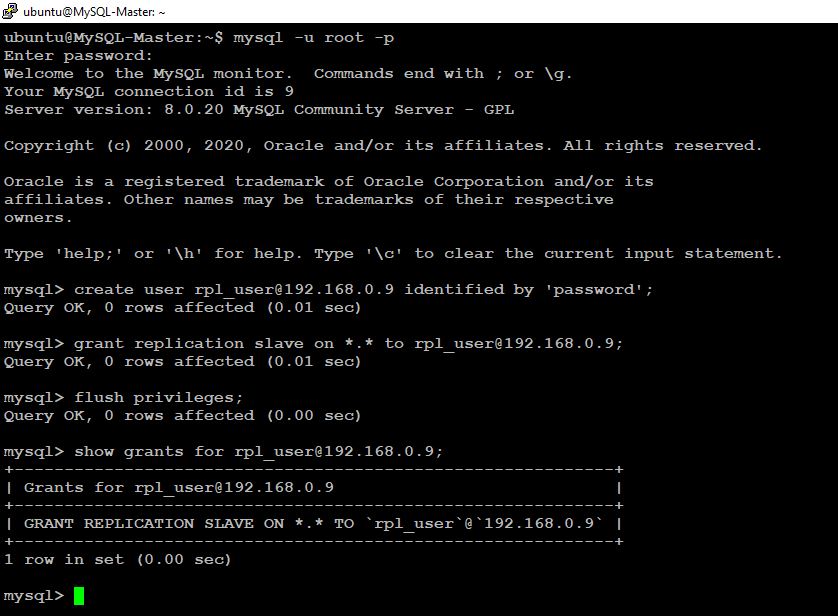
ubuntu@MySQL-Master:~$ mysql -u root -p
mysql> create user rpl_user@192.168.0.9 identified by ‘password’;
Query OK, 0 rows affected (0.08 sec)
Grant the user REPLICATION SLAVE privileges:
mysql> grant replication slave on . to rpl_user@192.168.0.9;
Query OK, 0 rows affected (0.09 sec)
mysql> flush privileges;
Query OK, 0 rows affected (0.00 sec)
Confirm grants for created user:
mysql> show grants for rpl_user@192.168.0.9;
+——————————————————————+
| Grants for rpl_user@192.168.0.9 |
+——————————————————————+
| GRANT REPLICATION SLAVE ON . TO rpl_user@192.168.0.9;|
+——————————————————————+
1 row in set (0.00 sec)
Step 3: Configure Slave Server
Let us configure slave by editing the file:
we have to configure below three configuration
server-id
read_only
log_bin
$ sudo vi /etc/mysql/mysql.conf.d/mysqld.cnf
log_bin = /var/log/mysql/mysql-bin.log
server-id = 2
read_only = 1
tmpdir = /tmp
binlog_format = ROW
max_binlog_size = 500M
sync_binlog = 1
expire-logs-days = 7
slow_query_log = 1
read_only = 1:
This sets the slave to read-only mode. Only users with the SUPER privilege and the replication slave thread will be able to modify data on it. This ensures there are no applications that can accidentally modify data on the slave instead of master.
server-id = 2:
This is a Unique server identification number. It will default to 1 if “master-host” is not set.
log_bin = /var/log/mysql/mysql-bin.log:
This enables binary logging. This is required for acting as a MASTER in a replication configuration. You also need the binary log if you need the ability to do point in time recovery from your latest backup.
Restart mysql server after you’ve finished making changes:
$ sudo systemctl restart mysql
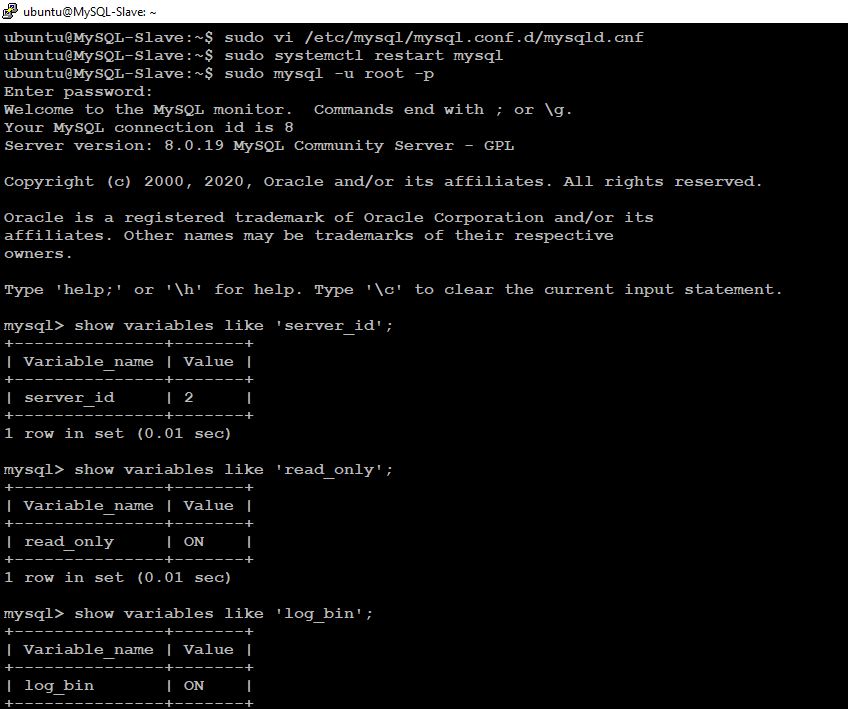
sudo vi /etc/mysql/mysql.conf.d/mysqld.cnf
sudo systemctl restart mysql
sudo mysql -u root -p
show variables like ‘server_id’;
show variables like ‘read_only’;
show variables like ‘log_bin’;
Step 4: Initialize Replication process
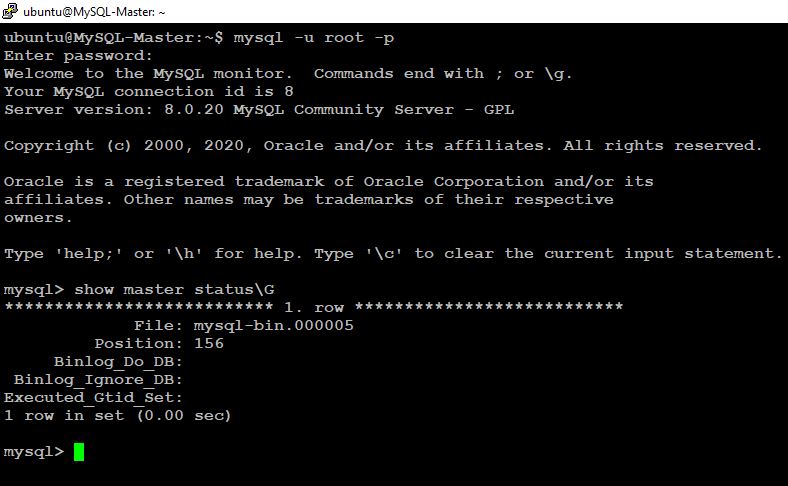
We should be ready to start Replication process on the slave server. Start by checking Status on the master:
mysql> show master status\G
* 1. row *
File: mysql-bin.000005
Position: 156
Binlog_Do_DB:
Binlog_Ignore_DB:
Executed_Gtid_Set:
1 row in set (0.00 sec)
Take a note of current Master log file and position. Then configure Slave server with details obtained from the master status command:
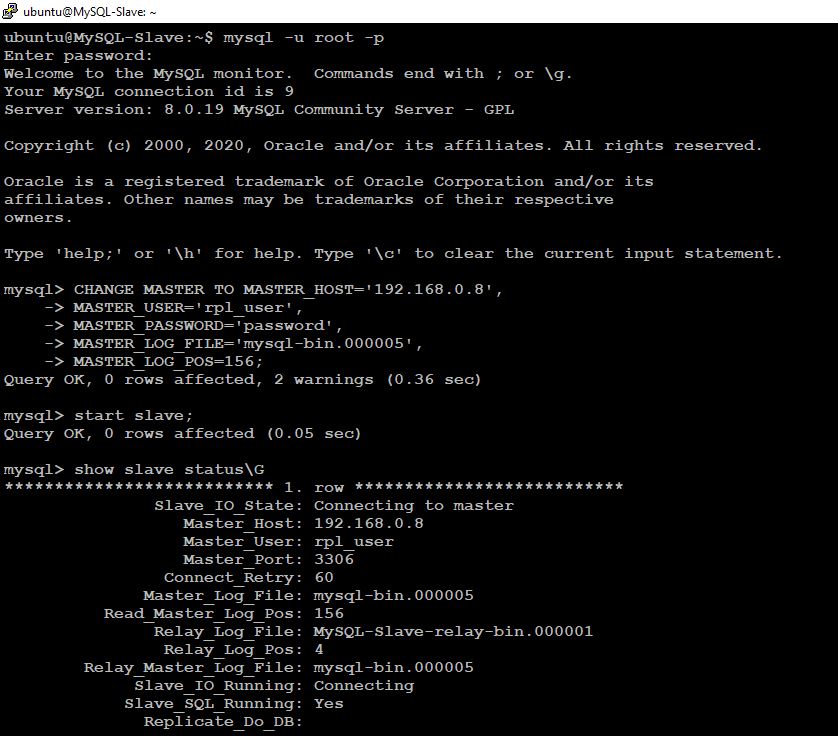
ubuntu@MySQL-Slave:~$ mysql -u root -p
mysql> CHANGE MASTER TO MASTER_HOST=’192.168.0.8′,
MASTER_USER=’rpl_user’,
MASTER_PASSWORD=’password’,
MASTER_LOG_FILE=’mysql-bin.000005‘,
MASTER_LOG_POS=156;
Query OK, 0 rows affected, 2 warnings (0.11 sec)
Then start replication on the slave:
mysql> start slave;
Query OK, 0 rows affected (0.06 sec)
To check slave status, use:
mysql> show slave status\G
* 1. row *
Slave_IO_State: Waiting for master to send event
Master_Host: 192.168.0.8
Master_User: rpl_user
Master_Port: 3306
Connect_Retry: 60
Master_Log_File: mysql-bin.000005
Read_Master_Log_Pos: 452
Relay_Log_File: MySQL-Slave-relay-bin.000003
Relay_Log_Pos: 323
Relay_Master_Log_File: mysql-bin.000005
Slave_IO_Running: Yes
Slave_SQL_Running: Yes
Replicate_Do_DB:
Replicate_Ignore_DB:
Replicate_Do_Table:
Replicate_Ignore_Table:
Replicate_Wild_Do_Table:
Replicate_Wild_Ignore_Table:
Last_Errno: 0
Last_Error:
Skip_Counter: 0
Exec_Master_Log_Pos: 452
Relay_Log_Space: 537
Slave IO and SQL should indicate running state:
Slave_IO_Running: Yes
Slave_SQL_Running: Yes
Appendix: Issues and Fixes
Issue 1:
Last_IO_Error: error connecting to master ‘rpl_user@192.168.0.8:3306’ – retry-time: 60 retries: 12 message: Authentication plugin ‘caching_sha2_password’ reported error: Authentication requires secure connection.
Solution:
ALTER USER rpl_user@192.168.0.9 IDENTIFIED WITH mysql_native_password BY ‘password’;
user rpl_user@192.168.0.9 identified by ‘password’;
Issue 2:
Last_IO_Error: Fatal error: The slave I/O thread stops because master and slave have equal MySQL server UUIDs; these UUIDs must be different for replication to work.
Reason:
Server UUIDs is automatically generated but it was copied when we cloned mysql instance
It can be simply fixed by removing that auto generated auto.conf file and restart MySQL server. Enjoy your MySQL Master-Slave replication!!!
Solution:
root@MySQL-Slave:~# cat /var/lib/mysql/auto.cnf
[auto]
server-uuid=3b17a6cb-8749-11ea-b5df-080027e5f7b1
root@MySQL-Master:~# cat /var/lib/mysql/auto.cnf
[auto]
server-uuid=3b17a6cb-8749-11ea-b5df-080027e5f7b1
On the Slave Node
Stop MySQL
sudo systemctl stop mysql
sudo rm -f /var/lib/mysql/auto.cnf
sudo reboot (You can restart the computer or Just restart the MySQL instance)